In this post, I will be solving a Capture the Flag (CTF) challenge that was originally from PCTF but later modified by a book dedicated to CTF-bootcamp. This challenge requires CTF players to emulate an ARM firmware image and correct a faulty cryptography implementation in the firmware logic.
Examinating the unknown firmware image
To make this challenge more down-to-earth, I always assume that the name of firmware file will not uncover any architectural information, and analysts hence need to identify its arch manually.
In this case, the cpu_rec that has been built upon a statistical approach, comes into play. It supports integration to binwalk as a module, which is also a well-known binary resolver.
First, let us get this plug-in loaded in our binwalk as below:
sudo apt-get install binwalk
git clone https://github.com/airbus-seclab/cpu_rec.git
cp cpu_rec/cpu_rec.py $HOME/.config/binwalk/modules/
cp -r cpu_rec/cpu_rec_corpus $HOME/.config/binwalk/modules/
binwalk -% [binary]
Given that the firmware image is encoded with IntelHex format, we decode it as a flat binary file:
sudo pip install intelhex
git clone https://github.com/python-intelhex/intelhex.git
cp intelhex/intelhex/scripts/hex2bin.py ./
python3 hex2bin.py confusedARM.hex confusedARM.bin
Beware that you could directly run enhanced binwalk on this hex file, it generates the same result. For simplicity reason, I stick to work on one target along the way.
binwalk -% confusedARM.bin

user@996e33e9a5b5:~$ binwalk -% confusedARM.bin

DECIMAL       HEXADECIMAL     DESCRIPTION
--------------------------------------------------------------------------------
0             0x0             None (size=0x200, entropy=0.614131)
512           0x200           ARMhf (size=0xe00, entropy=0.848492)
4096          0x1000          None (size=0x200, entropy=0.845391)
Hmmm, we only know this firmware originates from the ARM family instead of its endianness, whether it is a cortex-m binary, etc. It seems like we might need to get our hands dirty fron now on.
xxd -g 4 -l 100 confusedARM.bin
user@996e33e9a5b5:~$ xxd -g 4 -l 32 confusedARM.bin
00000000: 30070020 01010008 09010008 0b010008  0.. ............
00000010: 0d010008 0f010008 11010008 00000000  ................
From cortex-m perspective, the first eight bytes represent a stack pointer and entry point to a boot section. Following the raw bytes, the first four-byte stream is 0x30070020 in big-endianness but 0x20007030 in little-endianness; regarding the second four-byte, we have 0x01010008 and 0x8000101 in big and little endianness respectively. Additionally, the last bit of the second four bytes is set as 1, which indicates a thumb mode. To validate whether meaningful application logic starts there, we load the binary into 0x8000000 - a typical loading address for SRAM in cortex-m processors.
08000100 06 48  ldr r0=>FUN_08000a00+1,[DAT_0800011c]=08000A01h
08000102 80 47  blx 0=>FUN_08000a00 undefined FUN_08000a00()
08000104 06 48  ldr r0=>entry,[DAT_08000120]=080000EDh
08000106 00 47  bx  0=>LAB_080000ec
Upon examinating the assmbly code, we have found that there are two branch statements here, which is one of standing signatures to identify cortex-m firmware.
However, the whole process of identification is more or less heurstic, and we need to improve that in a more scentific manner in near future.
Locating super loop for main function
I am a lazy guy and do not want to locate main function manually since previous steps wear me out enough. Furthermore, jumping between functions is a double kill.
Hence, I have a strong reason to work on automation, scripting ghidra to list all functions involving a super loop, e.g., while(true).
import re
from ghidra.app.decompiler import DecompInterface
from ghidra.util.task import ConsoleTaskMonitor

program = getCurrentProgram()
ifc = DecompInterface()
ifc.openProgram(program)
pattern = r"while.*(.*true.*)"
fm = currentProgram().getFunctionManager()

funcs = fm.getFunctions(True) # True means 'forward'
for func in funcs:
		function = getGlobalFunctions(func.getName())[0]
		results = ifc.decompileFunction(function, 0, ConsoleTaskMonitor())
		if re.findall(pattern, results.getDecompiledFunction().getC()):
	        print("Function: {} @ 0x{}".format(func.getName(), func.getEntryPoint()))
After running this script, we have following candidate functions (never mind that super_loop has been named previously):
FindSuperLoop.py> Running...
Function: super_loop @ 0x080000f4
Function: FUN_08000be4 @ 0x08000be4
Function: super_loop @ 0x08001084
FindSuperLoop.py> Finished!
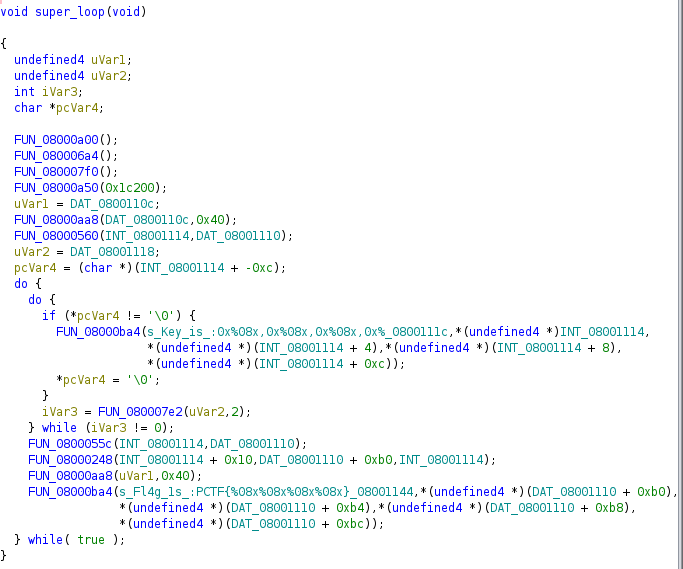
Upon examinating all functions, only the one located at 0x08001084 satisfies. Let us take a look at its decompiled code done by Ghidra (beware that I pick up meaningful parts of code to present):
 .
.
As checking this function, I identify one key and one potential encryption/descrption process, then assume that flat to be printed out is encrypted or decrypted string. Moreover, FUN_08000ba4 is an UART output function and it outputs two crucial information - key and flag. Thus, It is necessary to run it anyway.
So, from this moment on, I need to get an emulator into place, seeing what this function actually outputs. In this post, I pick up fuzzware instead of Unicorn mainly because of many disadvantages. Using Unicorn means that we have to build our analysis from scratch while fuzzware is built upon Unicorn and offers quite a few functionalities, e.g., debugging, func hooks. Notably, it is able to reach to meaningful firmware logic with help of its modeling approach, which stands out especially when some checking replies on communication between periphrals and the firmware logic.
Preparing configuration for emulation
According to fuzzware’s usage, we need to write a config.yml involving:
- memory regions
- interrupt controller
- user hook
For simplicity reason, I am not going to detail installation of fuzzware and only present my configuration without explaining too many cortex-m stuff (beware that this folder is placed in the fuzzware’s example folder):
include:
- ./../../configs/hw/cortexm_memory.yml
- ./syms.yml

memory_map:
  text:
    base_addr: 0x8000000
    file: ./confusedARM_raw
    permissions: r-x
    size: 0x13e8
    is_entry: True

handlers:
  uart_printer:
    addr: 0x08000ba4
    handler: fuzzware_harness.user_hooks.generic.stdio.printf

use_nvic: false
use_timers: false
use_systick: false
A idle symbol.yml is needed to satisfy all necessary config files. Nonetheless, I suggest providing as more symbols as possible in case these are available for debugging reason:
symbols:
  0x0: 'placeholder'
Having all files, in this folder containing two yaml files and one binary, I run fuzzware with fuzzware pipeline --disable-modeling -n 1. The reason why I disable modeling is low complexity of this firmware and
to reduce time spent on reaching to the function printing flag.
By checking tracegen.log in log folder, I could see all outputs:
DEBUG:emulator:Calling hook printf at 0x8000ba4
Fl4g 1s :PCTF{b9d652373a6969ffd99412a20000000}
However, this flag is invalid when I submitted. I later realize one faulty implemention of algorithm to be patched. Alright, emulation has not killed the game yet.
Identifying crypto algorithm by signatures
There are many open-sourced and premium tools to identify a crypto algorithm against their fingerprint database. In this post, I keep using binwalk to do this job.
user@996e33e9a5b5:~$ binwalk -B confusedARM.bin

DECIMAL       HEXADECIMAL     DESCRIPTION
--------------------------------------------------------------------------------
4526          0x11AE          AES S-Box
4785          0x12B1          AES Inverse S-Box
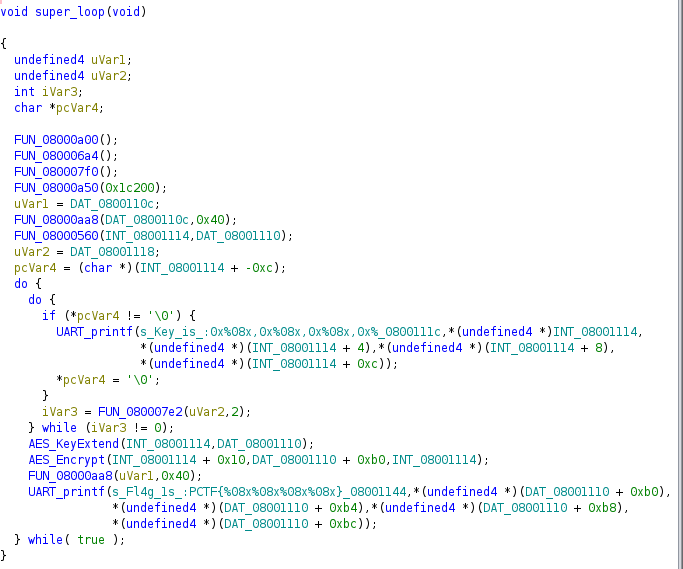
Cool, I now figure it out and review the superloop function again. Accoring to my crypto knowledge, after renaming all key crypto-related functions, the superloop looks like:
 .
.
This process is encryption when I realize that 16 bytes of input starting at DAT_08001110 are null. Three parameters of AES_Encrypt from left to right could be AES states, cipher, and an extended key.
However, INT_08001114 seems like pointing to its original key rather than extended key, and AES_KeyExtend extends a key by reading from INT_08001114, and outputs the extended one to DAT_08001110. Hence, I need to patch this address for trial.
080010e0 0c 4a           ldr        r2,[INT_08001114]=2000000Ch
080010e2 0b 49           ldr        r1,[DAT_08001110]=2000026Ch
080010e4 0b 48           ldr        r0,[INT_08001114]=2000000Ch
080010e6 10 30           adds       r0,#0x10
080010e8 b0 31           adds       r1=>DAT_2000031c,#0xb0
080010ea ff f7 ad f8     bl         AES_Encrypt
My approach is to set a breakpoint at 08000248 before the program actually executes AES_Encrypt, then change r2 as the value stored in [INT_08001110].
Back to fuzzware, it was running one round by one round, thanks to disabling modeling, I see only one main001 folder representing one round of emulation that has been in progress until I terminated it. There is a fuzzer folder containing all fuzzing instances that represent artifacts of AFL runs. So, I only have one fuzzing instance, then just emulate its current input as following command: fuzzware emu -v -M -b 0x08000248 fuzzware-project/main001/fuzzers/fuzzer1/.cur_input, where specified v and M represent printing some exit information and enabling memory tracing. Note that any breakpoint should be assigned to a basic block since fuzzware keeps track of exeuction in basic-block granularity.
After the breakpoint is hit, the fuzzware hands the control over to embedPython. At this moment, we could use fuzzware-specific langauges to modify value in a register as
ipdb> uc.regs.r2=0x2000026C
ipdb> uc.regs.r2
0x2000026c
ipdb> cont
After continuing the emulation, the breakpoint would be hit once again, we could scroll back to previous logs:
DEBUG:emulator:Calling hook printf at 0x8000ba4
Fl4g 1s :PCTF{14ff306b13ea82d2e463bb8220000000}
Unfortunately, this flag is invaild after submission. In the meantime, I found that flag looks sort of weird when it comes to the last four bytes - 0x20000000, which did not look like normal encrypted bytes. Upon examinating the UART_printf, I identified that its fourth parameter refers to the register r4, which is an incorrect value. Then I need to directly check actual values corresponding to these four address:
*(undefined4 *)(DAT_08001110 + 0xb0),
*(undefined4 *)(DAT_08001110 + 0xb4),
*(undefined4 *)(DAT_08001110 + 0xb8),
*(undefined4 *)(DAT_08001110 + 0xbc)
Fortunately, due to enabled memory tracing, I could be able to check memory writes to these four bytes since these did happen during encryption.
Basic Block: addr= 0x000000000800052c (lr=0x2000012c)
        >>> Read: addr= 0x20000274[SP:+0490] size=4 data=0x48494a4b (pc 0x08000540)
        >>> Read: addr= 0x20000278[SP:+048c] size=4 data=0x4c4d4e4f (pc 0x08000542)
        >>> Write: addr= 0x20000324[SP:+03e0] size=4 data=0xe463bb82 (pc 0x0800054a)
        >>> Write: addr= 0x20000328[SP:+03dc] size=4 data=0xa82c1a37 (pc 0x0800054a)
        >>> Write: addr= 0x2000031c[SP:+03e8] size=4 data=0x14ff306b (pc 0x0800054e)
        >>> Write: addr= 0x20000320[SP:+03e4] size=4 data=0x13ea82d2 (pc 0x0800054e)
So, having these values, I re-construct the real flag as PCTF{14ff306b13ea82d2e463bb82a82c1a37}.
Other approaches
In regard to other write-ups, Keil MDK, as an IDE of embedded development, also supports simulation to a given firmware image only when users specify its corresponding development board, printing received UART data in the terminal. Users could also set a breakpoint in the assmbly window. Howeve, I am not entirely sure if MDK allows patches on binary.
Future work
Configuring fuzzware is not as easy as we expect. When having a totoally unknown firmware image, figuring out its processor and vendor could provide very useful information for configuration. Hence, a future work to myself comes down to “how to identify a firmware image in processor or vendor”.